


Help & Tutorials - HTML Editor Topics
Answers to questions about our HTML Editor
- HTML Editor FAQ's
- Beginner's Guide (Start Here)
- Editing Your Web Pages
- Editing Other File Types
- Add-ons and Widgets
- File Management
- Search Engine Optimization
- Managing your Account
- Contact Support
Editing Your Web Pages
Inserting / Editing Tables
What are Tables?
One of the unique features of HTML is its ability to create tables. Think of tables as the skeleton or framework of a web page. Tables are commonly used for two purposes in web pages:
A). Used to form the layout of a web page (positioning various objects on the layout of your web page)
B). Used to display tabular data (such as rows/columns of information)
C). Used to format and set-up how text/images are positioned in the content area of a web page with respect to each other.
Take advantage of Tables
Although tables are becoming more obsolete with the use of CSS and XHTML, for the novice website designers and editors, they remain one of the simplest and preferred methods of organizing content on a web page.
Through the use of tables in the editing system you can better organize content on your web page.
Let's take the following example:
On the left we have a short content piece with an image inserted within. On the right the content is organized into 2 columns with an image nicely placed and aligned with respect to the text on the left and below it.
This example makes it apparent that using tables is a great method to format the layout of content as well as images on your web pages.
 |
 |
Content without use of table |
Content organized using a table |
The basics in using tables
Tables are composed of 2 elements: Rows and Columns. You can create a table with a virtually unlimited number of rows and columns. However, it is best to limit the number of these elements and use only as many rows and/or columns as needed. (In the case of the example shown above, the table is composed of one row and only 2 columns)
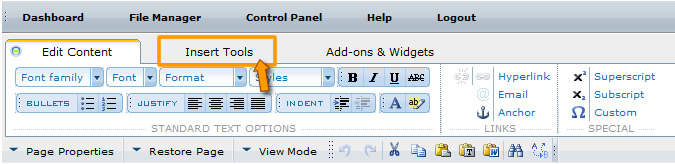
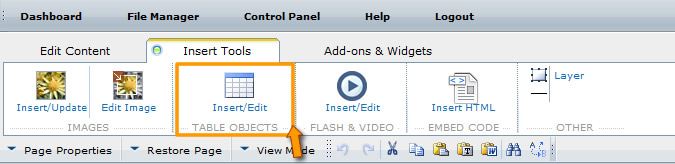
On the editing system you can access table functions via the "Insert Tools" tab on the editing menu.
Inserting a New table
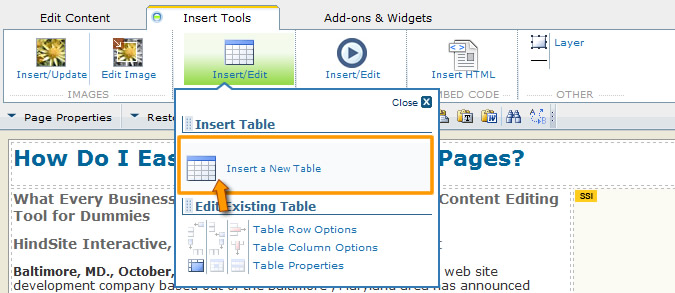
Inserting a table is quick and easy:
1). First Place your cursor in an empty area then click on the "Insert New" icon.
2). You will then be presented with a pop-up panel that will allow you to input the table parameters including number of rows, columns, border, etc.
3). Select the desired settings
Refer to Easy Tip and the visual on the Table pop-up for more tips.
Table Attributes
border: Changes the border of the table. Default border is 1.
bgcolor: Changes the background color of the table.
align: Aligns the table to left, center, right. Default Alignment is left.
CellPadding: It indicates the space between the border and content of the cell.
CellSpacing: It indicates the space between two cells.
Modifying an EXISTING Table
You can modify an existing table with any of the following methods:
Option A). Left click on any area of the table grid, then select from any of the table property icons from the Insert Tools panel.
| Add row AFTER current row selected | Add row BEFORE current one selected | |||
| Delete current row selected | Add Column BEFORE current one selected | |||
| Add row AFTER current one selected | Delete current column selected | |||
| Show properties for selected table | Shows properties for selected cell | |||
| Shows properties for selected row |
Option B). Right click on any area of the table grid, and you can select from the list of options available pertaining to table. With this option you have a few additional choices including copy/paste and the ability to split and merge table cells and rows. Common Tips: You can also manually manage the width and height of your table by selecting a table, clicking on a white selection square, and dragging to the desired size:
You can also modify individual table cells by inserting your cursor inside a cell and right clicking to access the table cell property panel. Deleting a table For example: if the width of the content area of your web page is 500 pixels wide, inserting a table wider than 500 pixels will likely disrupt the look of your entire layout. Important Note: Width/Height of tables: Always be careful when selecting the width of your tables. For example, DO NOT insert tables wider than the width of the content/layout area of your web page. |
 |
Common topics on editing the content of your web pages:
- Text Editing
- Linking to Pages & Documents or other sites
- Inserting and Editing Tables
- Inserting and Editing Images
- Inserting and Editing Media
- Creating New Web Pages
- Adding HTML / Embed code from a third party
- Other Tools