


Help & Tutorials - Website Goodies
Answers to most common questions about our Website Add-ons
- Overview
- Photo Gallery
- Calendar
- Flash Maker
- Music Player
- Carousel
- Image Editor
- Content Ticker
- Contact Form
- Site Map
 Flash Maker
Overview
Easily Create Interactive Flash presentations and animation on your website
With the Easy WebContent Flash Maker add-on, you can simply create custom, professional Flash banners and animated slideshows to publish to your websites or blogs. Create fully customized Flash graphics for your website with this astounding feature.
The Flash Maker feature is user-friendly and intuitive, making it easy for even the most inexperienced web designer. No HTML or special coding skills are needed
In order to fit the style and theme you are seeking, there are numerous available templates that can be used for the creation of your Flash graphics. These templates can then be fully modified to your exact needs and specifications and help make your website dynamic and stand out from the competition.
Video Tutorial
(How to use the Flash Maker on your site)
How to use the Flash Maker Add-on
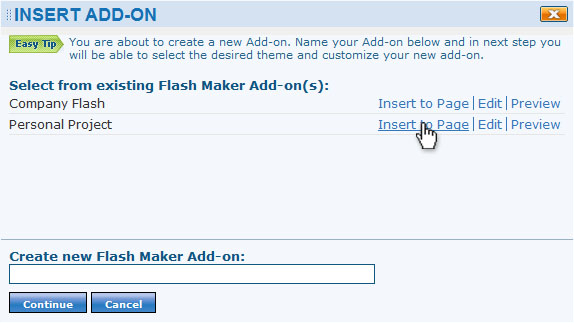
When the Flash Maker Add-On is opened, a list of existing Flash clips will populate in the menu. If you wish to use one of these clips, simply click “Insert to Page” beside the desired clip. You also have the options to edit and preview these existing clips.
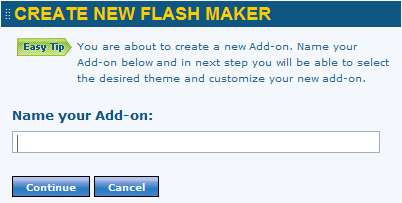
In order to create a new Flash clip, simply name it in the field under “Create New Flash Maker Add-On” and click “Continue.” On the next screen you will be prompted to select from the available template themes. You can preview these themes before choosing them and once you have made your choice, click “Select This Template.”
After selecting a template it is now time to customize your Flash. In the left window, you can preview what your final clip will look like on the fly as you customize it to your exact specifications. Under the “Preset Options” drop-down menu, you can pick the theme you would like your clip to utilize. Examples of existing themes are metal, chrome, gold, pastel, etc. and you can choose which style will fit your web page best.
Next, customize the size of your clip to your needs.
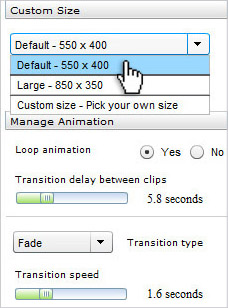
Under “Manage Animation” click Yes or No as to whether you want your clip to loop. This means that once the clip is finished, it will restart from the beginning. You can also set the “Transition delay between clips.” Choose the amount of time you want to each frame to stay on the screen before transitioning to the next frame.
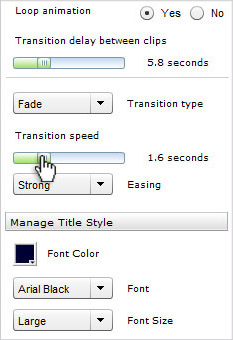
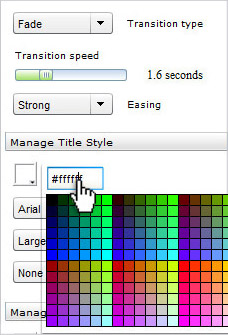
With the “Transition Type” menu, you can choose whether you want your clips to fade, zoom, wipe or any of the other numerous options. You can also set the “Transition Speed” which refers to the amount of time between one frame to the next. Under the “Easing” drop-down menu, you can choose how you want your clip to transition into the next. You can preview any of these styles on the fly as you edit by selecting them.Under “Manage Description Style” you can alter the color, font, size and text effects of your clip. The “Text Effect” menu allows you to add glow, shadows, beveled edges and more to your text.
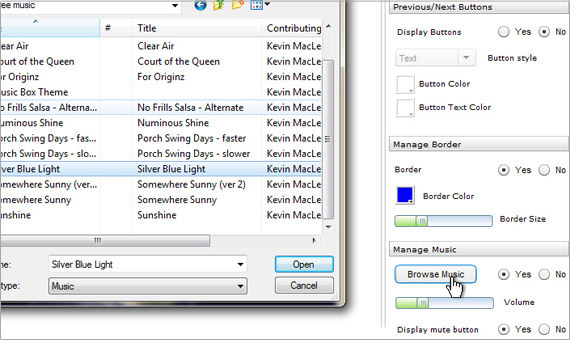
The “Previous/Next Buttons” menu allows you to choose whether to display buttons that will allow user to fast forward or rewind to the previous or next frames of your clip. You can also select the button style, color and color of the text.Under “Manage Border” you can choose whether or not to display a border as well as the border size and color.
You can also add music to your clip with the “Manage Music” menu. Click “Yes” to add music. Next, click “Browse Music” to view available music files. This will display the contents of your hard drive where you can select a music file and upload it to your account. You can also set the volume level and display a mute button on your clip for users that do not wish to hear the associated music file.
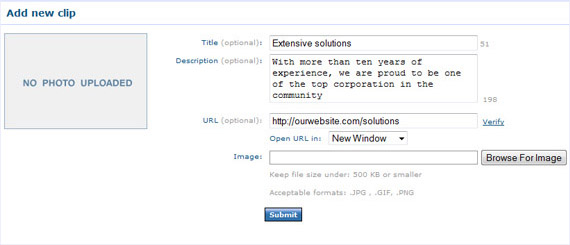
When all of your options are correctly set, click the “Populate Flash” button on the top of the menu. This is when you can upload various clips consisting of images, text and links to your Flash. Fill out the corresponding “Title” and “Description” fields. If you want this clip to be clickable to a certain web page, put the address in the URL field. You can also choose whether to open the URL in the same window or a new window. In the “Image” field, click “Browse for Image” to upload an image from your hard drive to use with your clip. Click “Submit” when complete.
You will then be brought to the “Manage Your Clips” window where you can edit, delete or move up or down your clip. When all clips are inserted, click “Publish Flash” on the top right of the window.
First, you can quickly and easily publish the Flash to the page you are currently editing by simply clicking “Insert To Page.” Beneath this button you will see a field with the HTML embed code for your clip. You can copy and paste this code in order to embed the clip into any web page. Additionally, a direct URL to your clip is generated so that you can share it with others via email, etc. When this URL is entered into a web browser, the user will see the clip you have created.